
How To Repurpose Old Dressers Into Bathroom Cabinets

This comprehensive guide provides step-by-step instructions, design ideas, and SEO-optimized tips for a stunning DIY project.
Keywords: dresser to bathroom vanity, repurpose dresser, DIY bathroom vanity, old dresser makeover, bathroom storage, upcycled furniture, vintage bathroom, bathroom renovation, budget bathroom makeover, rustic bathroom vanity, modern bathroom vanity, farmhouse bathroom vanity, bathroom cabinet ideas, DIY home improvement, furniture upcycling, sustainable home decor
Introduction:
Tired of the same old boring bathroom? Yearning for a unique and stylish vanity without breaking the bank? Look no further than your attic, basement, or local thrift store! Old dressers, often overlooked and destined for the landfill, offer incredible potential for transformation into stunning, functional bathroom vanities. This comprehensive guide will walk you through the entire process, from selecting the perfect dresser to the final touches, ensuring your DIY project is a resounding success. We’ll cover everything from essential tools and materials to advanced techniques for achieving a professional finish. Get ready to unleash your inner designer and create a bathroom vanity that reflects your personal style and saves you a significant amount of money.
Table of Content
I. Selecting the Right Dresser:
The foundation of your project lies in choosing the right dresser. Consider these factors:
- Best Backsplash for Honey Oak Cabinets: Choosing the Perfect Match
- Pewter Green Kitchen Cabinets: A Timeless Addition to Your Kitchen
- pale grey light grey kitchen cabinets
- flooring for dark cabinets
- Cherry Wood Cabinets Kitchen: A Timeless Beauty
-
Size and Dimensions: Measure your bathroom carefully. The dresser should fit comfortably without overwhelming the space. Consider the available wall space, plumbing fixtures (toilet, shower), and door clearances. A smaller dresser might work best for smaller bathrooms, while a larger one can be perfect for spacious bathrooms needing ample storage.
Style and Aesthetics: Think about your bathroom’s overall style. A rustic dresser can complement a farmhouse-style bathroom, while a sleek, modern dresser works well in a contemporary setting. Consider the color, material (wood type, veneer), and hardware. Does the existing style need a complete overhaul, or can it be enhanced with minor modifications?
-
Construction and Condition: Inspect the dresser thoroughly for structural integrity. Check for wobbly drawers, damaged wood, loose joints, and signs of water damage (crucial for a bathroom environment). Minor repairs are manageable, but significant structural issues might make the project too complex or costly. Solid wood dressers are generally preferred over particleboard for durability and longevity.
-
Drawers and Storage: Assess the number and size of drawers. Adequate storage is essential in a bathroom. Consider whether you need more or fewer drawers, or if you need to add extra shelves or compartments.
Related Article How to repurpose old dressers into bathroom cabinets

II. Essential Tools and Materials:

Before you begin, gather these essential tools and materials:
- Safety Gear: Safety glasses, work gloves, dust mask.
- Measuring Tools: Tape measure, level.
- Power Tools: Drill, screwdriver (cordless is recommended), sander (orbital sander is ideal).
- Hand Tools: Screwdrivers (various sizes), putty knife, hammer, chisel.
- Woodworking Supplies: Wood filler, sandpaper (various grits), wood stain or paint, primer, sealant (water-resistant), varnish or polyurethane (water-resistant).
- Plumbing Supplies: Plumbing connectors (if adding a sink), sink, faucet, drain assembly, flexible supply lines.
- Hardware: New drawer pulls, knobs, hinges (if needed).
- Cleaning Supplies: Degreaser, rags, brushes.

III. Step-by-Step Transformation:
A. Preparation and Cleaning:
- Empty and Disassemble: Remove all drawers and hardware.
- Clean Thoroughly: Clean the dresser thoroughly with a degreaser to remove dust, dirt, and grime. Allow it to dry completely.
- Repair and Fill: Repair any cracks, holes, or damage using wood filler. Sand smooth once dry.
B. Surface Preparation:
- Sanding: Sand the entire surface of the dresser using progressively finer grits of sandpaper to achieve a smooth finish. Pay attention to corners and edges.
- Priming: Apply a water-resistant primer to seal the wood and provide a better surface for paint or stain. Allow to dry completely.
C. Painting or Staining:
- Choose Your Finish: Select a paint or stain that complements your bathroom’s style. Water-resistant options are essential for a bathroom environment.
- Application: Apply several thin coats, allowing each coat to dry completely before applying the next. Sand lightly between coats for a smoother finish.
D. Plumbing Installation (If Applicable):
- Cutout for Sink: If you’re installing a sink, carefully measure and cut a hole in the countertop (if the dresser has one, otherwise you’ll need to add one). Use a jigsaw for precise cuts.
- Plumbing Connections: Connect the sink, faucet, drain assembly, and supply lines according to the manufacturer’s instructions. Ensure all connections are tight and leak-free.
E. Hardware Installation:
- New Hardware: Install new drawer pulls, knobs, and hinges. Choose hardware that complements the overall style of the vanity.
F. Sealing and Finishing:
- Sealing: Apply a water-resistant sealant to protect the dresser from moisture.
- Varnish or Polyurethane: For added protection, apply a few coats of water-resistant varnish or polyurethane.
IV. Design Ideas and Customization:
- Rustic Charm: Preserve the natural wood grain with a clear sealant or a light stain. Add rustic hardware for a charming farmhouse look.
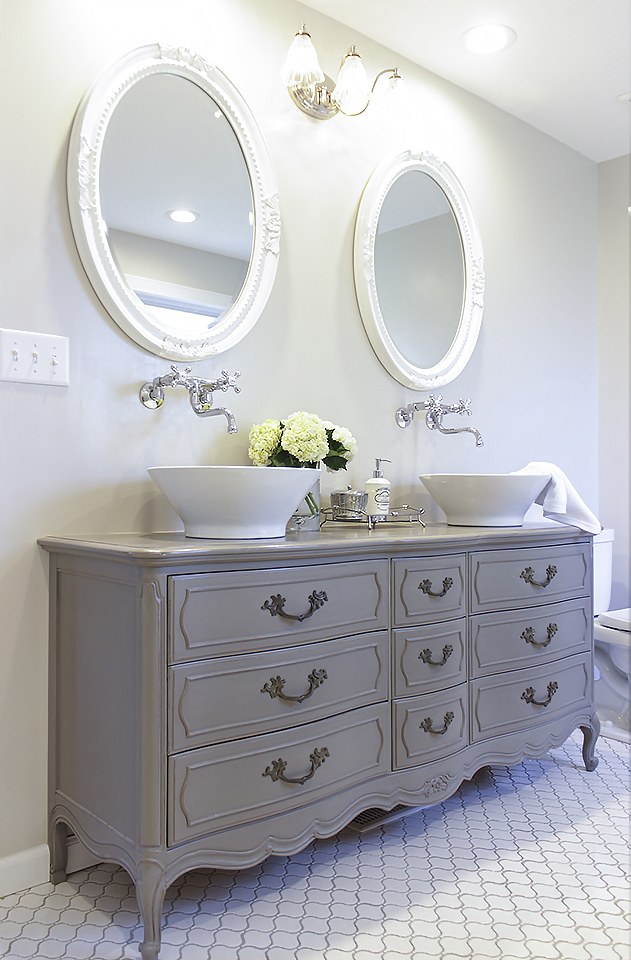
- Modern Minimalism: Paint the dresser in a sleek, neutral color like white or gray. Use simple, modern hardware.
- Coastal Chic: Paint the dresser in a light blue or seafoam green. Add nautical-themed hardware.
- Eclectic Fusion: Combine different paint colors or techniques (like distressing) for a unique and eclectic look. Mix and match hardware for a personalized touch.
V. Advanced Techniques:
- Adding a Countertop: If your dresser lacks a countertop, you can add one using materials like butcher block, marble, granite, or even a durable tile.
- Creating Custom Drawers: If the existing drawers are insufficient or damaged, consider building custom drawers to fit your needs.
- Incorporating Lighting: Add under-cabinet lighting for improved functionality and ambiance.
VI. SEO Optimization and Conclusion:
This guide provides a detailed walkthrough of repurposing an old dresser into a bathroom vanity. Remember to optimize your content for search engines by using relevant keywords throughout the article (as shown above), creating high-quality images, and promoting your project on social media. By following these steps, you can create a unique and functional bathroom vanity that adds character and style to your bathroom while saving money and reducing waste. The satisfaction of transforming an old piece of furniture into a beautiful and useful addition to your home is immeasurable. Embrace your creativity, and enjoy the process! Share your finished project with us – we’d love to see your stunning creations!


